Thursday 22 March 2012

7 ways to increase Torrent Speed

The use of Bit Torrent is an efficient way to transfer files of just about any size quickly and efficiently. How this works is by breaking the huge files into smaller pieces and is from one or many of the different sources. This is one of the best ways to transfer bulky files quickly even when you are using a low bandwidth connection. There are many more things that you can do with Bit Torrent, but here we are going to discuss how to make this work much faster.
increase torrent speed
Here are some essential tips for the same,
  1. Start with your ISP:
All ISP has a preset maximum upload and download speed, and you cannot make your torrent work beyond this speed. All you can do is to use the best use of this upload and download speed even when the signal is weak. You can check the maximum speed that you can achieve by conducting a broadband speed test and compare with the DSLReports that comes with your uTorrent.
  1. Opt-In for healthy seeds and peers:
A peer is any computer participating           in downloading and uploading of torrent files along with that of yours. A seeder is one who has a complete copy of the file that is being shared across a torrent network. A leecher is the person who has joined the network recently and do not have most of the file that you or the peer has. This leecher becomes the seeder when they download the entire file and is able to share it across the network.  For getting high torrent speed, you need to increase the number of seeders to increase the chance of healthier and reception of higher speeds.
  1. Get through the firewall:
Many times, you will find the administrator or the firewall in your web browser is set to block and receive torrent files. The first thing that you need to do is to get appropriate permissions for downloading torrent files, and add this to your firewall, which will enhance the speed at which you can download torrent files. If the internet is through a router, then you have to set the torrent file to cross the barrier of the security of the router also.
  1. Go to a different port:
The default port for BitTorrent protocol is always between the numbers 6881-6999. This is because BitTorrent sharing will involve high bandwidth usage. However, this is possible that you can configure a different port for your torrent client and this has been best advised to set this number to somewhere around 10000.
  1. Limit your upload rate:
A peer to peer network is sharing alike on the same or similar platform and therefore you should be able to set your client’s upload speed rate to a maximum amount, which will usually be about 80 percent of your maximum upload speed that is being offered by your ISP. Keep this speed, as high as possible, but you have to play your cards well as the upload speed affects your download speed as well.
  1. Use your common sense:
If you understand the concept of how Bit Torrent works, then your common sense will automatically tell you that this is possible to view the individual files being downloaded and disable the ones that you are not in need off, which will  help you to speed up the process of downloading the files using Bit Torrent.
  1. Bandwidth and connections:
This is possible to set the maximum number of connections, maximum number of peers connected per torrent and number of slots per torrent so that you can decide on which numbers gives the maximum efficiency from your Bit Torrent files.
Now is that you have some tips on how to increase the speed of downloading while using Bit Torrent, why not try these tips out next time! Comments are appreciated!!

4 Ways to Get Faster Boot Up Times

A faster boot up seems to be an elusive goal more than a reality. However, you can decrease the time it takes to start up your computer in Windows by minutes in some cases. With just a few tweaks, you can get your boot up time down to 30 seconds and not 20 minutes. This article will give some quick and easy tips for faster boot up times.
Step 1: Hard Disk Check Up
Over time, your hard drives gets degraded both physically and digitally. It’s important to monitor your drives health. An error or damaged sector can throw software loading into an infinite loop causing long load times. To check your drive health:
1. Click Start
2. Choose Computer
3. Right Click your Hard Drive
4. Choose Properties
5. Click Check Drives Health. After, the check up gives you repair options or a clean bill of health.
6. Restart to get a faster boot up.
Step 2: Eliminate Startup Delay
To get faster boot up speeds, you can cut the boot delay to 0. The delay is in place to allow your startup processes some breathing room during loading. Your default delay is 30 seconds. So, you can eliminate it for faster boot up times.
1. Open your Start menu.
2. Click Run
3. In the command screen, type msconfig
4. In the system configuration utility, click either BOOT tab.
5. In the boot menu, change the default setting for the Time Out from 30 to 5 seconds.
Step 3: Organize your Hard Drive
If you are looking for something in a messy room, naturally, it’s going to take you longer to find something. This is a good metaphor for a hard drive. Over time, filing system gets disorganized. Periodically, you need to reorganize this filing system on your hard drive. Luckily, Windows has a good utility called Defrag that will put your system in order.
1.Open the Start Menu
2. Click on My Computer
3. Right Click your C: drive or your hard drive image.
4. Scroll down to the Click Properties
5. In the Properties Menus, Open the “Tools” menu.
6. Choose Defragment.
7. In the Disk Deframenter menu. Click on Defragment
Step 4: Remove Excess Startup Programs
Most programs you add to your computer will opt to load when you startup your computer. Eventually you will rack up a load of programs that kill faster boot times. You need to reduce the startup programs. You can easily disable unnecessary startup programs. Here is how:
1. Open your Start menu.
2. Click Run
3. Type msconfig, click Enter
4. In the system configuration utility,click either services or startup tab.
5. Uncheck all programs that your are no longer want to run in the background.
6. Click OK

Protect Your PC Using a USB Flash Drive

Now you can protect you PC by just using a USB flash drive. This is possible due to a great software called Predator. Predator locks your PC when you are away, even if your Windows session is still opened. It uses the USB flash drive as an access point. Using the software is really very easy.
usb_flash_drive
Using Predator
  • First of all insert the USB drive.
  • Then run Predator Software.
  • Now just do your work.
  • When you want to leave the computer for some other work just remove the USB drive. Once it is removed, the keyboard and mouse are disabled and the screen darkens.
  • When you return back to your PC, you put the USB flash drive in place and keyboard and mouse are immediately released, and the display is restored.
secure pc with a usb flash drive
Features of Predator
  • Predator is available in both free and professional versions.
  • Predator can send alert messages by Email or by SMS.
  • Predator records all security-related events in a log file: start, alarms, stop. By reading this log, you will know if intruders have tried to use your computer while you have been away.
  • Predator frequently changes the security codes recorded on your USB drive. If an intruder manages to copy your stick, this copy will not work because the codes on your own stick will have changed in the meantime.
  • Predator disables the Windows task manager when you unplug the USB drive. Nobody can stop it with Ctrl-Alt-Del.
  • Predator disables the CD Autorun feature in Windows, to prevent intruders from running malware on specially crafted CDs.
  • Predator lets you regain control of your computer if you lose your stick: when you start the software for the first time, you set a password that will unlock your session if your USB drive is not available.
  • Predator can sound an audible alarm if somebody enters an invalid password.
  • And finally, Predator can protect several PCs with the same USB flash drive, e.g. your home and office computers.
Download Predator From Here.

Make Folders with Invisible Names


You may have given or find varieties of folder name in your or in your friend’s computer. But have you ever tried to give your folder a blank name or in other words an invisible name? Computer by default do allow you to take space as your folder name. Here are the few steps which will help you to create your without name folder.
Step1: Click the right button of your mouse on the folder whose name you wish to keep invisible.
Step2: Now click on Rename.

 Step3: Now pressing the “alt” key, type “0160”.
However, type this number only with the help of keypad which is on the right hand side of your keyboard.
Step 4: Now simply click anywhere outside folder.

How to install windows via USB

Windows 7 USB/DVD Download Tool Creates and Makes Bootable DVD Disc or USB Flash/Hard Drive from ISO Image
1. Download Windows 7 USB/DVD download tool [ HERE ]
  1. Run the Windows 7 USB/DVD Download Tool.
  2. In the Source file box, type the name and path of Windows 7 ISO file,
  3. OR click Browse and select the file in the Open dialog box, then click Next.
  4. Select USB device to create a copy of Windows 7 installation media on a USB flash drive or DVD to create a copy of Windows 7 installation media on a DVD disk, then click Next.
  5. Insert USB flash drive or external hard disk into USB port, or DVD disc into DVD writer/burner tray.
  6. For copying the Windows 7 file to a USB flash drive, select your USB device in the dropdown list and click Begin copying. For copying the file up to a DVD, click Begin burning.
  7. WUDT will format storage media, and then copying Windows 7 files over to the media.
    Tip: Do make sure that no important data is stored on the USB flash drive as it will be formatted (deleted).
  8. Once bootable USB device or DVD created successfully, user can install Windows 7 by navigating to the root of DVD or USB flash drive and double-clicking Setup.exe. It’s also possible to install Windows 7 directly from the USB key or DVD by booting from the USB key or DVD, where Windows 7 installer will be automatically launched.
In order to copy Windows 7 setup files to a bootable USB key or USB flash drive, at least 4 GB of storage space capacity is required.

How to unlock Vodafone K3565 Modem

To unlock Vodafone K3565 net modem please follow the instructions given below
Step 1: Install VMC (Vodafone Mobile Connect) Lite Software
Step 2: Download Universal MasterCode generator for Vodafone K3565 from [ HERE ]
Step 3: Run the Universal MasterCode generator and enter the IMEI number of your Vodafone K3565 modem and then click on calculate button. Remember to select the huawei tab on the top

Step 4: Now download and run cardlock unlock software from [ HERE ]
Step 5: Now copy the unlock code, and enter the unlock code of your vodafone k3565 in the space provided in Card Unlock software and press OK and wait for the unlock successful message.
Step 6: Now you need to download the new dashboard and update it into the vodafone k3565 modem from [ HERE ]
Step 7: Install the mobile partner again from the modem amd that’s it. Now your vodafone k3565 modem is successfully unlocked and is ready to be used with any sim as you like.

Show Your Picture and Profile Link in Google Search of your site

As I write in my previous article "Show Your Picture and Google Plus Profile link in Google Search (Only For Blooger)". For good traffic from Google search we have to link up our site with Google search (Index your Site in Google Search).

Now if you want good trafic from Google So you have to Improve SEO of your blog . Now for SEO we use many tips . But By using Google Apps (Webmaster tools, Google Analyst etc) we can make it fast.

Here is the Search View of my Blog "Gets World Updated" in Google , with my Picture (Pointed with arrow) and name which include my Google Plus Profile Link(Highlighted in Picture).

Now If You want see tour Picture and Your Profile Link in Google Search . then follow these steps.

Step 1. Create an "About Me" Page on Your Blog, Where you write your information . Don't forget to link up "About Me" page with "Google Profile Page".

Here is the tag by which you can link your Google Profile with your "About Me" Page


<a href="https://profiles.google.com/your_ID" rel="me">My Profile</a>


Note: Do Remember to use rel="me" same like upper code, don't  change rel , You have to change only your Google Plus Profile Link in href="your Google Plus Profile Link" or you can change My Profile Text say (Follow me on Google plus), Then write this full tag any where in about me page.

Step 2. Now you must ensure that your "About Me" page link up with every post in your blog , Means Every post on your blog must consist your "about me" page link .

Here is the tag by which you can link up your "About me " page with every post


<a href="http://sitename.com/about" rel="author">Read More About Me</a>


Note: Do Remember to use rel="author" Same as shown in upper anchor tag code , you have to chance href="With your about me page link", Now if you want to change "read more about me" text, you can.


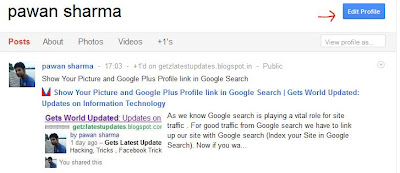
Step 3. Now, Login in your Google Profile , after Login Click on "Edit Profile"  .

Google Picture in search
Google Other Profile

Step 4. Now you get "Other profile" option on Right Hand Side.

Click on the "Other Profile" then you get an pop up window

Now Clink on "Add Custom Link"


Enter the Lable as "About" and URL as your "About me" Page link.

Then click save !


That's all!

Now , When Google Re-Crawl your blog next time its automatically recognize new content and start showing your picture with search result of your blog.

You can check your authorship status by using Google rich snippets tool by copy paste URL of one of your article.
Hope You Liked It ! Get Latest Updates Directly To Your E-Mail